使用sklearn的iris数据,用svm模型进行拟合并使用cross validation进行模型的选择和参数调优。
数据
sklearn中有大量的数据,保存在sklearn的datasets包中。sklearn的datasets包中提供了载入本地小数目数据(load_<dataset_name>函数),本地生成数据(make_<dataset_name>函数),网上下载公开的大数据集(fetch_<dataset_name>函数)。
加载本地数据
方法有:1
2
3
4
5
6
7
8
9
10
11
12
13
14
15datasets.load_boston([return_X_y]) Load and return the boston house-prices dataset (regression).
datasets.load_breast_cancer([return_X_y]) Load and return the breast cancer wisconsin dataset (classification).
datasets.load_diabetes([return_X_y]) Load and return the diabetes dataset (regression).
datasets.load_digits([n_class, return_X_y]) Load and return the digits dataset (classification).
datasets.load_iris([return_X_y]) Load and return the iris dataset (classification).
datasets.load_linnerud([return_X_y]) Load and return the linnerud dataset (multivariate regression).多变量线性回归 [Todo]
datasets.load_wine([return_X_y]) Load and return the wine dataset (classification).
#加载图片数据
datasets.load_sample_image(image_name) Load the numpy array of a single sample image
datasets.load_sample_images() Load sample images for image manipulation.
#加载非sklearn的数据(csr格式)
datasets.load_svmlight_file(f[, n_features, …]) Load datasets in the svmlight / libsvm format into sparse CSR matrix
datasets.load_svmlight_files(files[, …]) Load dataset from multiple files in SVMlight format
数据集文件在sklearn安装目录下datasets\data文件下。
以加载iris数据为例:1
2
3
4
5
6
7
8
9
10
11
12
13
14
15
16
17
18
19
20
21
22
23# 引入datasets
In [4]: from sklearn import datasets
# load iris数据集
In [5]: iris = datasets.load_iris()
In [6]: iris
Out[6]:
#所有iris数据集的属性可以通过iris.<AttrName>,其中最重要的两个属性是target和data,分别是数据的label(Y)和feature(X)值,feature_names和target_names是feature和label的名称。
{'DESCR': 'Iris Plants Database...',
'data': array([[5.1, 3.5, 1.4, 0.2],
[4.9, 3. , 1.4, 0.2],
[4.7, 3.2, 1.3, 0.2],
...
[6.2, 3.4, 5.4, 2.3],
[5.9, 3. , 5.1, 1.8]]),
'feature_names': ['sepal length (cm)',
'sepal width (cm)',
'petal length (cm)',
'petal width (cm)'],
'target': array([0, 0, 0,...]),
'target_names': array(['setosa', 'versicolor', 'virginica'], dtype='<U10')}
In [7]:
本地生成数据
方法有:
1 | datasets.make_biclusters(shape, n_clusters) Generate an array with constant block diagonal structure for biclustering. |
返回值是一个X,Y的tuple。
以make_classification为例,生成一个n分类的数据集。
函数原型:1
sklearn.datasets.make_classification(n_samples=100, n_features=20, n_informative=2, n_redundant=2, n_repeated=0, n_classes=2, n_clusters_per_class=2, weights=None, flip_y=0.01, class_sep=1.0, hypercube=True, shift=0.0, scale=1.0, shuffle=True, random_state=None)
重要参数:
n_samples:样本数目
n_features:特征值数目
n_classes:类别数目
n_informative:有用feature的数量1
2
3
4
5
6
7
8
9
10
11
12
13
14
15
16
17
18
19
20
21
22
23
24
25
26
27
28
29
30
31
32
33
34
35
36
37
38In [21]: X, Y = datasets.make_classification(n_samples = 500000,n_features=20,n_classes=10, n_informative=15)
In [22]: X.shape
Out[22]: (500000, 20)
In [23]: Y.shape
Out[23]: (500000,)
In [24]: X[0:5,:]
Out[24]:
array([[ 4.20716048, 2.89816159, -2.22520281, 2.91608569,
-2.65978401, -0.58548034, -1.35236908, 1.45854599,
1.22915019, 0.83945602, -0.37039011, 1.51500123,
3.30974065, -3.72031774, -0.69192637, -0.42726318,
1.01004173, -2.14431752, -3.34576998, 1.41292011],
[ -4.22939888, -2.99845979, -0.16778885, -1.87307099,
-3.29458426, 0.87069235, 0.35871264, -0.1094688 ,
2.39924663, 1.65507134, 3.74740054, 0.52876375,
-11.20088226, -4.77106708, -1.10166238, -0.24131795,
2.73772299, 1.63735191, -7.44364439, 2.58440319],
[ 0.04585477, 1.02962404, -0.88752286, -1.53726562,
0.13273288, 1.25377358, 1.3764017 , -1.08588389,
-1.36256052, 0.59297559, 2.1830424 , 1.07222261,
-0.62803604, -1.62130681, 0.08642698, -0.51030915,
0.49853178, 1.70330411, -4.04308849, 0.69609419],
[ 1.09212846, -1.7176523 , 0.33377855, -0.73225257,
-0.25529192, 1.72512901, -2.74140273, -1.70123362,
0.8635851 , 0.26074242, -2.43043595, -0.0501557 ,
-3.23266432, 0.80834196, 1.0274291 , -0.82542901,
1.34949996, 0.62395031, -0.70523628, 4.29576291],
[ -1.03360432, -4.53231556, -0.11623221, -1.88667928,
4.48409721, -0.6291969 , -4.76071967, 0.32996626,
-4.86525783, -5.83460699, -4.82609817, 3.47267425,
-14.43950814, -0.53638362, 3.87523929, 0.84315801,
3.93050841, 3.10874535, -4.29160614, 3.59139518]])
In [25]: Y[0:5]
Out[25]: array([0, 7, 1, 4, 3])
网上下载数据
方法有:1
2
3
4
5
6
7
8
9
10
11datasets.fetch_20newsgroups([data_home, …]) Load the filenames and data from the 20 newsgroups dataset.
datasets.fetch_20newsgroups_vectorized([…]) Load the 20 newsgroups dataset and transform it into tf-idf vectors.
datasets.fetch_california_housing([…]) Loader for the California housing dataset from StatLib.
datasets.fetch_covtype([data_home, …]) Load the covertype dataset, downloading it if necessary.
datasets.fetch_kddcup99([subset, data_home, …]) Load and return the kddcup 99 dataset (classification).
datasets.fetch_lfw_pairs([subset, …]) Loader for the Labeled Faces in the Wild (LFW) pairs dataset
datasets.fetch_lfw_people([data_home, …]) Loader for the Labeled Faces in the Wild (LFW) people dataset
datasets.fetch_mldata(dataname[, …]) Fetch an mldata.org data set
datasets.fetch_olivetti_faces([data_home, …]) Loader for the Olivetti faces data-set from AT&T.
datasets.fetch_rcv1([data_home, subset, …]) Load the RCV1 multilabel dataset, downloading it if necessary.
datasets.fetch_species_distributions([…]) Loader for species distribution dataset from Phillips et.
下载下来的数据会放在~/scikit_learn_data目录下,如果想保存到其他的地方,可以传入data_home参数,作为下载的目标位置。
来源 sklearn
模型的选择与评估
sklearn官网给出的模型选择参考: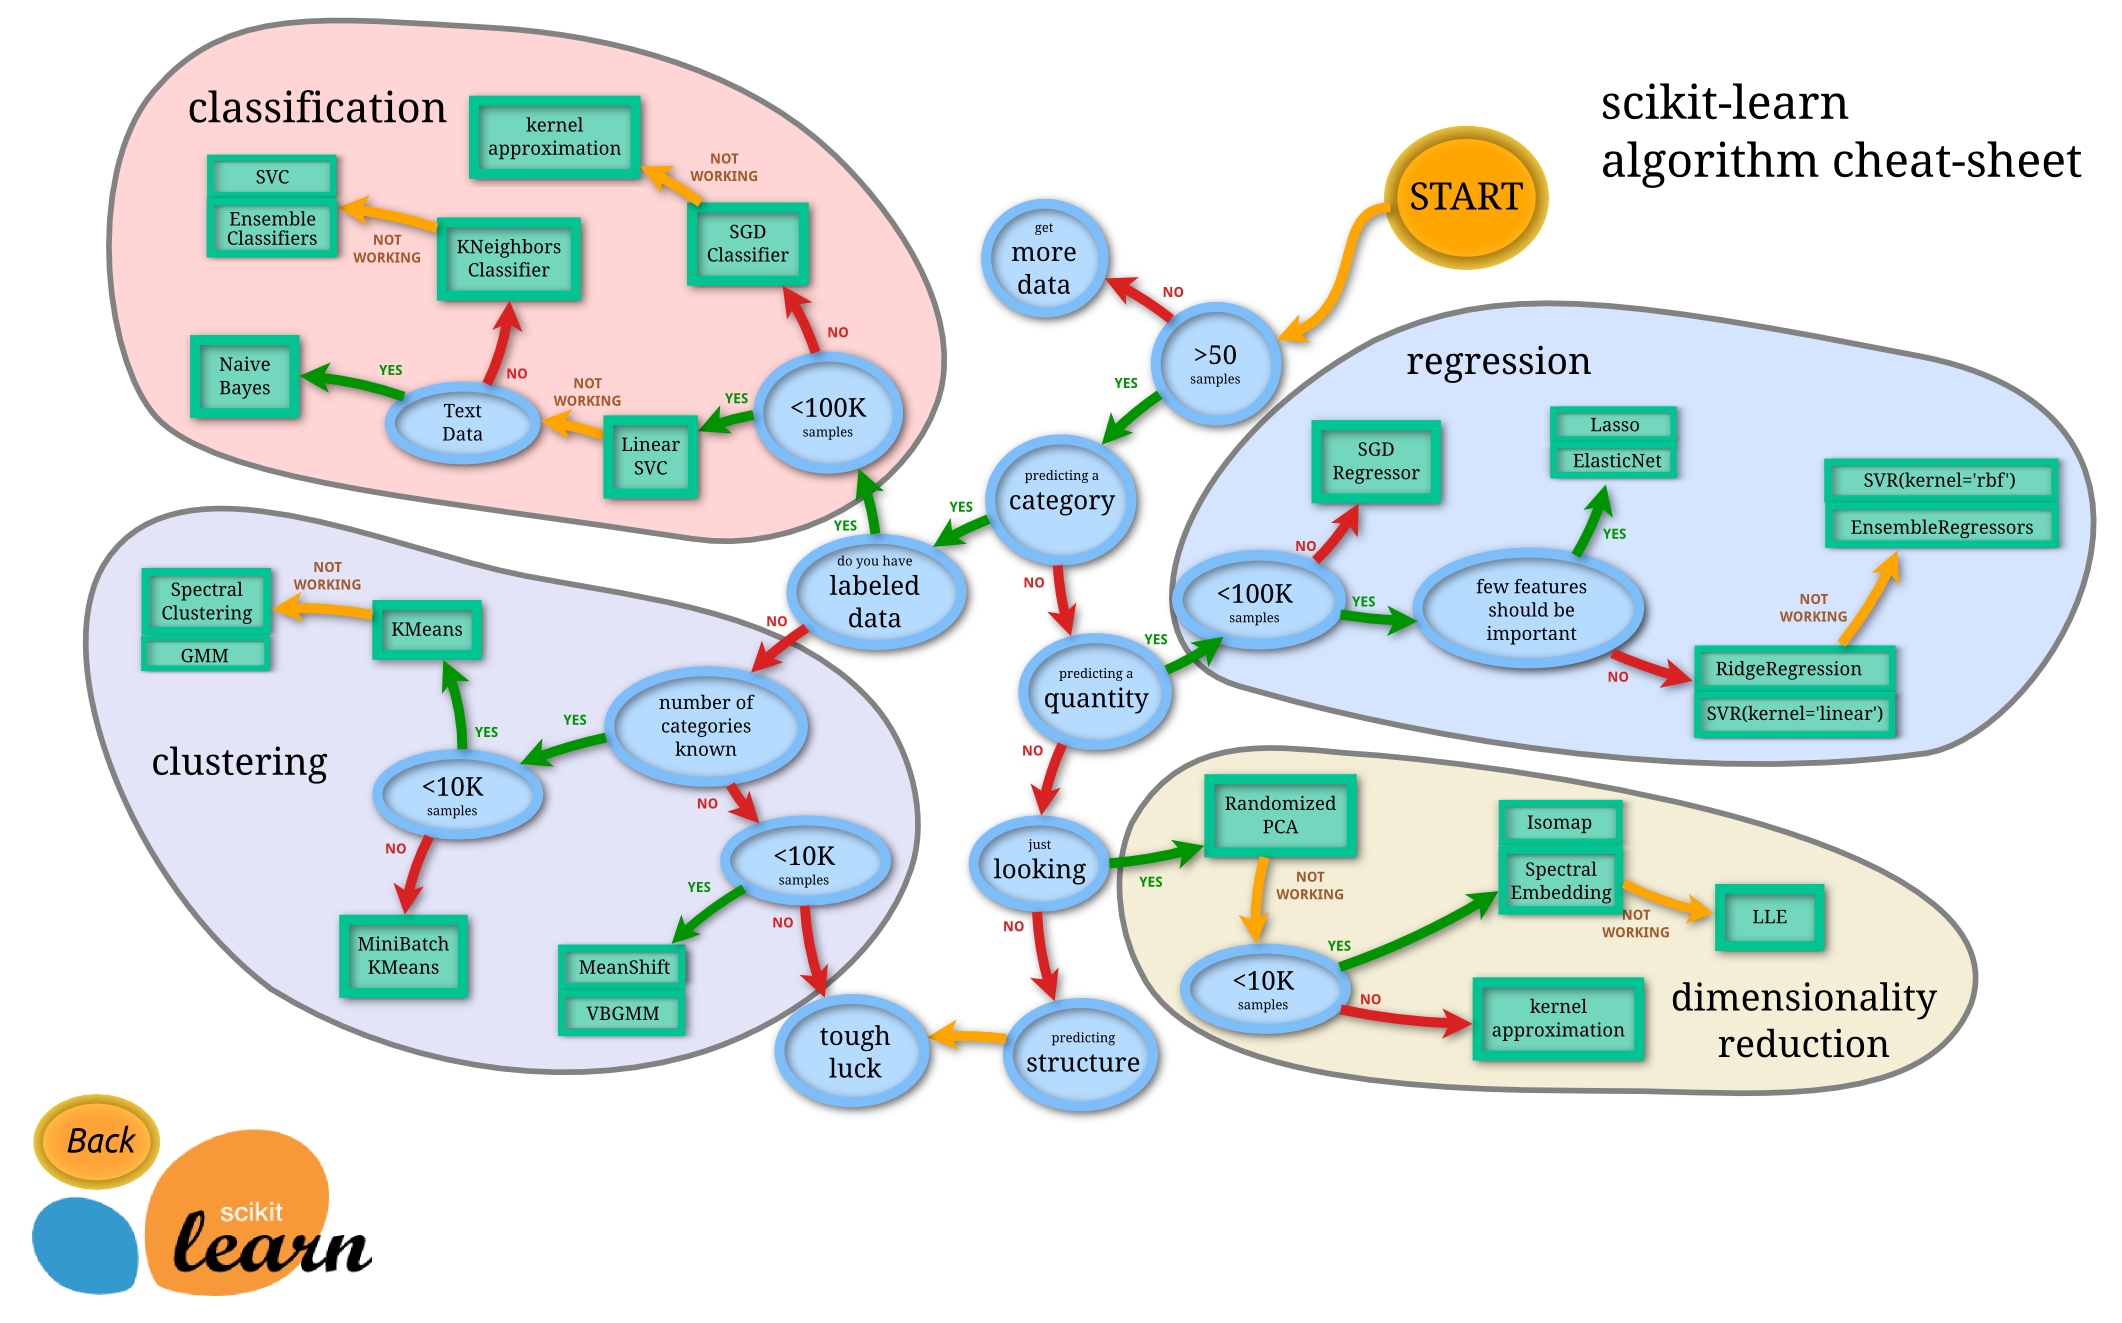
常用模型
监督学习
常用线性模型
sklearn.linear_model中包含了sklearn的主要线性模型函数。主要包括Linear_Regression线性回归,Ridge岭回归,Lasso回归,BayesianRidge贝叶斯脊回归(用于回归问题的贝叶斯方法), LogisticRegression(逻辑回归),Stochastic Gradient Descent(SGD随机梯度下降法),Elastic Net (弹性网络回归)。
模型学习从三个角度理解:
- The Hypothesis Function:假设函数,也就是用于最终预测新数据的函数。在线性回归中,为
- $x^2$
Linear_Regression
- The Hypothesis Function:
loss function:
Ridge,RidgeCV
Lasso
[TODO]
BayesianRidge
[TODO]
LogisticRegression
SGD
Elastic Net
[TODO]
 至此,我们已经将github pages的大半事情做好了,接下来,你可以进入abc.github.io,看到的大概是
 至此,大概可以理解为戏台已经搭建好了。